Showing posts with label hostess. Show all posts

5.29.2008

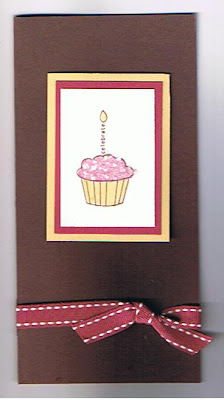
Celebrate! (with a cupcake)


I made a whole bunch of birthday cards tonight - some belated and some in advance. These are 3"x6" cards, so you can make 4 from a sheet of 12"x12" paper. They also fit nicely in Stampin' Up's long skinny envelopes.

Here are the card ingredients:


  • Cause for Celebration - hostess stamp set

  • Chocolate Chip, Purely Pomegranate, So Saffron, and Whisper White Cardstock

  • Basic Brown classic ink (doesn't run, so it's great for coloring)

  • So Saffron and Pink stampin' write markers

  • Chunky Essentials Glitter (adhered with 2-way glue pen)

  • Purely Pomegranate double-stitched ribbon

Did you know that time is running out for Purely Pomegranate and the other products in the In Color series? Stampin' Up introduced the In Color line as a collection of trendy colors, to be changed every 12 months. This year's collection includes: Purely Pomegranate, Wild Wasabi, River Rock, Soft Sky, Groovy Guava, and Blue Bayou. These colors will be available in limited quantities after June 15, and will no longer be available after August 10. That means all card stock, ink pads, refills, ribbon (like the double-stitched ribbon above) will no longer be available in the 6 In Color options. The good news is that on August 11, Stampin' Up will introduce a new group of In Color selections. Stay tuned to http://www.shilohstamps.com/ for more details about the new In Color collection.

(Thanks, http://rubbermoonlighters.com/ for the cool image!)

5.05.2008

A little bit of happiness


Part of my daily routine is checking the Stampin' Up demonstrator website, since they post new samples of cards and scrapbook pages daily. It's a great place for ideas and inspiration. Here's one of today's samples, by Michelle VanWiggeren. I like how it shows a trail of dots tracing the path of the butterfly. The card also uses Stampin' Pastels for some soft coloring. It features the A Little Bit of Happiness hostess set that Amy P. just earned as part of the Stampers 6 Club.

Here are the other supplies it uses:

Paper:
CARD STOCK APRICOT APPEAL 8 1/2X11
CARD STOCK ALMOST AMETHYST 8 1/2X11
CARD STOCK CERTAINLY CELERY 8 1/2X11
CARD STOCK WHISPER WHITE 8 1/2X11

Inks:
CLASSIC STAMPIN PAD APRICOT APPEAL, BASIC BLACK
STAMPIN WRITE MARKERS SOFT SUBTLES

Accessories:
STAMPIN PASTELS
SNAIL ADHESIVE PERMANENT
CRYSTAL EFFECTS

If you would like access to the Stampin' Up Demonstrator website, which includes thousands of professional samples, patterns, and business resources, consider signing up to be an SU demonstator. During the month of May, SU is offering 20% off the regular price of the new demonstrator Starter Kit and a free Hodgepodge Hardware set for everyone who enrolls in May. Click here for more details, or e-mail me at alison@shilohstamps.com.

4.29.2008

Free Shipping now until April 30


Since I haven't done any classes or workshops this month, I'm offering FREE STANDARD SHIPPING from now until April 30. This would be a great time to take advantage of the Free Wheelin' special, which is a free coordinating Stampin' Around when you order any of 6 pre-selected stamp sets. All of the Free Wheelin' wheels feature the jumbo wheels, which I find much more forgiving to use. Contact me today at alison@shilohstamps.com to place your order and take advantage of free shipping.

Also, here's a picture of the swap I made for our PhillyInkers meeting a few weeks back. I made a whole bunch of these, and I've been using them for all sorts of cards - thank you cards, sympathy cards, birthday cards, Thinking of You. I like that it's a pretty neutral floral motif that can be used for many different purposes. Here are the supplies for the card:


  • From the Garden hostess set

  • Basic Grey, Pretty in Pink, and Regal Rose Cardstock

  • Basic Grey Taffeta Ribbon (new in the Spring Summer catty)

  • Rhinestone Brads in Fire (the rhinestone is pink, but it's hard to tell from the scan)

I got the Fire and Ice rhinestone brads free as part of Great Rewards, an incentive program for Stampin' Up demonstrators. They are $10.95 a box, and I got both boxes FREE! Let me know if you would like to know more about the benefits of being a Stampin' Up demonstrator.

1.29.2008

Happy Birthday to Mom

Today is my mom's birthday, and here's the card I mailed her today. Let's see if she sees it on the blog before it arrives in her mailbox. I mailed the same card to my my mom-in-law, whose birthday was the 21st. My mom and my mom-in-law both requested stampin' goodies for their birthdays this year, so my mom got tons of stamp sets, courtesy of my dad. My mom-in-law got some punches and some stamps and some things for her new house.

Sorry for the blurry picture of this card. I was playing with the camera on my new phone, and it looks like I don't quite have it down yet. The card uses In The Spotlight (a retired hostess set) and a new celebrate set. It's hard to tell in this picture, but I used paper piercing in the corners and there's a brad in the middle of the starburst image. There's also a piece of grosgrain ribbon going across the middle of the card.

1.25.2008

Coaster-Rama report

Coaster-Rama went very well the past couple nights. Here's a sampling of some of the coaster creations. Above is a coaster I made with the new Time Well Spent hostess set. This might be a birthday or Valentine's gift, I haven't decided yet.


Kim made this lovely set of coasters using a retired stamp set called Batik. She spent lots of time mapping out the design on paper, and then came up with a perfect coordinated and symmetrical finished product - lovely!


Amy made these coasters using a combination of Time Well Spent and a retired hostess set. I love how she stamped a flower behind the sentiment using a light yellow ink. It really ties the whole image together. All class attendees received some satin ribbon to tie up their coasters, since they make a lovely gift. Although this ribbon was available by the spool in December, the chocolate chip satin ribbon is still available as part of the Theater ribbon originals collection.


I made this pirate coaster for Jon to commemorate his pirate birthday party we had last November. It uses a stamp set called Ahoy Matey.


I made this coaster tonight, as I was inspired by one of Tiffany King's designs. It uses one of my favorite stamp sets - Baroque Motifs.

1.12.2008

Super-Fast Christmas Thank-You cards


Growing up in the Handy household, (yes, that's my maiden name) writing thank-you notes was part of our holiday tradition. Although I sometimes resented this practice as a kid, I have grown to value this tradition as an adult. I have tried to find ways to stay on top of thank-you notes as my dear husband and I establish our holiday traditions. This year, I think I figured it out. I packed a little card-making kit in my carry-on bag as we travelled to TX for Christmas. In a quart-size Ziploc bag, I included:
  • 10 Really Red pre-cut cards - I cut the cardstock at home, since TSA doesn't like scissors and paper trimmers on the plane
  • 10 Very Vanilla envelopes
  • 10 pre-cut pieces of Designer Series paper, Cerise and Dashing (now retired, this was a great way to use up my scraps!)
  • 10 pre-cut Christmas sentiments from the now-retired Perfect Presentation hostess set
  • 10 pre-cut pieces of Real Red 5/8" grosgrain ribbon
  • my mini-stapler
  • bone folder
  • 1 sheet of dimensionals
  • SNAIL

When we had a weather delay leaving TX, I was able to make my Christmas thank-you notes at the airport. It was like having my very own Simply Sent kit! I folded all the cards, then adhered designer paper to the front of each card, using my SNAIL. Then I stapled on some ribbon and added a sentiment using dimensionals. Super-fast and cute to boot! This may become a Shiloh Stamps holiday tradition. That is, if we travel every year...


I also made a similar card-making kit for my Little Sister through Big Brothers Big Sisters. She's a crafty gal, so I made her a card-making kit. Inside the pretty box, I put a stamp set, a mini-stamp pad, some dimensionals, pre-cut cards, envelopes, and lots of ribbon. I also included a sample card to give her some ideas. The next day, she presented me with a lovely handmade card!


Also, here's a picture of Gary (my bro-in-law), Jon, me, and my sis in the Santa hats my mom made us. We were all in TX for Christmas together this year, which is a rare treat. Gina's and Gary's have stars, since they are stars of the stage. You might remember from an earlier post that Gina won an Arizoni award for her role in Seussical with Childsplay and Gary was selected to attend an international conference on theater for young audiences. My mom must have taken the Buy Handmade pledge, too, since she made us Santa hats and aprons - fun!


PS - Sorry I haven't been updating the blog lately, although Jon did figure out how to make the page wider (nice, huh?). I've been working on getting my new Stampin' Up Demonstrator Business website up and running. Have you had a chance to check it out yet? You can view it at shilohstamps.stampinup.net. I haven't decided if I want to keep it or not, since it's not free like blogger. Let me know if you feel like it's worth paying for after the 2-3 month free trial period.

12.30.2007

A Very Coaster Christmas

Back in November, Super-Stamper Melanie Robson taught us PhillyInkers* how to stamp on marble tiles to make coasters. I absolutely loved this project, so I decided to make a whole bunch of coasters to sell at the Circle of Hope Art Shop in early December. After much success with the coasters at the Art Shop, I decided to make coasters for people on our Christmas list. After all, I had signed the Buy Handmade pledge, saying that I would give handmade gifts this year.

If you are interested in purchasing some coasters or learning how to make your own coasters, please e-mail me at alison@shilohstamps.com.


* = The PhillyInkers are a fantabulous group of Stampin' Up demonstrators based in the Philadelphia region. We are all part of Claire Lawrence's downline. Every month we get together to share business ideas and do some stamping together. You can find links to many PhillyInkers blogs in the Favorite Stampin' Links list at the right. Let me know if you would like to sit in on one of our meetings sometime. Our next meeting is January 14th, and it will be in NJ.

10.18.2007

Leafy goodness

When Jon and I were doing our wedding registry and picking out gifts we'd like to receive, we quickly noticed a pattern - Jon loved anything that was blue or chrome or both; I loved many things green or vine-patterned or both. Well I'm not suprised that Jon loved the blue sparkly snowflake card from Christmas in August stamp camp, while I'm very drawn to all the leafy images and earth tones of autumn. Here are two earthy leafy cards I've made this week. Above, I used the Sidekick Sayings set on Chocolate Chip cardstock with Wild Wasabi accents - I love that green! Sidekick Sayings is a hostess set I received with a recent order. It's lots of fun, so I'm sure I'll be posting more samples soon.

Note: This card is a new trendy size 3"x6". This size is perfect for 12"x12" cardstock. You can make 4 cards out of 1 sheet!
Above is another leafy card using the Stem Silhouettes stamp set from the Holiday Mini catalog. This set was part of the Fall Frenzy promotion. I stamped the leafy images using Versamark ink on glossy cardstock. Then I brayered over the images with So Saffron ink. I love the Sun Print look it creates. I layered it on Really Rust cardstock, tied some hemp twine around it, and put it on a Bravo Burgundy cardfront. Super-simple!

8.30.2007

More In the Spotlight with the scallop punch

I love experimenting with different color combinations and layouts. Which of these is your favorite?This one is for my cousin Alisa's birthday. It's all part of my goal of staying on top of my birthdays! I now have my Birthday Calendar posted on the wall of my stamping room, so there's no excuse for missing birthdays. This was a thank-you for a birthday gift. I have so many generous friends!

This was a thank-you for a super-stamper friend who loaned me her Powder Pal for Christmas in August Stamp Camp. It made the Dazzling Diamonds glitter a lot less messy!


This was a thank-you for my latest workshop hostess. I'll be sending her a $5 gift certificate, too!

I'm off to Cape Cod today for a few days of vacation, so I won't be posting until after Labor Day. I'll be bringing some stamping supplies with me so that I can make swaps for the Philadelphia Regional convention. I will post some samples when I return.
Hope you enjoy the long weekend, too!


8.25.2007

Much Appreciated - scallop punch!

I have been making lots of thank-you cards lately for all the housewarming gifts, birthday gifts, and just generous friends. Here's a thank-you card featuring my new favorite punch, the scallop punch. It fits just perfectly with this image from the In The Spotlight hostess set. I love how Wild Wasabi and Purely Pomegranate look with Night of Navy here. It's hard to tell in this pciture, but my Wild Wasabi layer is actually a scrap leftover from another scallop punch. It gives this card some extra dimension. For more thank-you note ideas, click the "thank you" label list at the right.

8.07.2007

My first "big" swap


One of the joys of being a Stampin' Up demonstrator is participating in card swaps. A bunch of people (in this case 10) make 10 of the same card, mail them to the "host" and then someone mails everyone 1 of each card. Swapping is a great way to get samples of stamp sets you may not have or to have samples of a different style than yours.

This particular swap calls for a stamp set that's new in the Fall-Winter Collection 2007 that was not in the Preview catalog. I chose to use my favorite new set, In the Spotlight. It's a hostess set. This is the same layout as a card we made at my Open House in June, but it uses a different color background. The other one used Vintage Violet, which is now retired.

Sometimes when you make a swap, you include a "recipe" on the back of the card listing all the ingredients needed to make that card.

This swap was hosted by a member of the INKredible Impressions group of demonstrators. We all share common uplines, so we're 'related' in the Stampin' Up family through Super-Demonstrator Tina. I'm also a part of the PhillyInkers, Claire's downline. Being connected to these groups of creative ladies is half the fun of being a demonstrator!

7.26.2007

Waterfall cards from an in-home workshop


When I do an in-home workshop, I try to demonstrate projects that the hostess is interested in trying out. For a recent in-home workshop, the hostess requested the waterfall card. It's what's called a "movement card". When you pull the tag on the right, it waterfalls open revealing a message inside. I demonstrated the waterfall card at a workshop last week. The hostess really liked the sage shadow/chocolate chip color combination that she saw on a sample at my Open House, so I chose a waterfall card design that incorporated those colors. I love the Baroque Motifs set looks with this color
combination. I think this would be a very elegant card for a wedding, since it says "cherish" inside. You could certainly change the sentiment inside to make it a thank-you or birthday card, too.

Here are a couple other examples of waterfall cards. I learned how to make waterfall cards when I participated in Stampin' Down the Shore with Claire and Kristin. (You can see pictures of the weekend if you click those links.) We spent the weekend at the Jersey Shore making all sorts of crafty projects.
Adding a layer of neutral cardstock on each layer of the waterfall can make for a more polished design, but it's a bit more complicated. Both these cards use hostess sets that I got for free when I signed up to be an SU demonstrator.

If you would like a template for making the waterfall card, e-mail me at alison@shilohstamps.com. PLEASE INCLUDE "WATERFALL CARD" IN THE SUBJECT LINE, SO I KNOW THAT IT ISN'T SPAM. I would be glad to mail you a sample if you will send me your address. There's also a tutorial about making waterfall cards on Splitcoast Stampers. They have an amazing gallery of waterfall cards, too. There is also a sample of a waterfall card on Claire's blog here.


7.10.2007

Thank you very much + an experiment with brads

This is one of the cards that we made at my Open House last weekend. I love its simple design and crisp palette. I made a bunch of these cards, and I just changed the sentiment at the bottom to "Birthday Hugs and Wishes" on a few.


This card was inspired by a few stampin' things I've learned on the web. First, I was hoping to use up my Vintage Violet cardstock, since it's no longer available. I discovered the Color Combinations Tool, a website that helps you coordinate Stampin' Up colors. I selected Vintage Violet, and then clicked "search". It gave me all sorts of color combinations that use vintage violet. I don't think I would've put these colors together on my own. There's a link to the Color Combinations tool in the Stampin' Links list on the sidebar of my blog.


Also, I have new favorite tool, thanks to this card. I'm really enjoying the paper piercing tool and the paper piercing template. Using the guide, I can punch evenly spaced holes in my cardstock. It makes a really cool effect, and I like how it looks with this stamp set that already has dots around the edges. I can punch holes wherever I like, which means that I can punch holes to put brads in the center of these flowers.


I got this stamp set for free when I signed up to be Stampin' Up Demonstrator. It's called "In the Spotlight" and it's a hostess set from the new Fall-Winter Collection 2007 which debuted July 1st. You can get it for free when you host a Stampin' Up workshop in your home. I got it in May, though, so I got a head start on making projects with it. (My stamping friends were jealous!) I'll be posting some other samples soon.


So I learned a lesson with brads while working on this card. I haven't worked with brads very much before. I was trying to use up my stash of non-Stampin' Up brads, while I was waiting for my SU brads to arrive. (It doesn't make sense to demonstrate products that I don't sell.) I discovered that these pewter mini circle brads (pictured on the left) are really hard to open. You know how the legs on brads are usually two different lengths, so you can open them up? Not so with these brads... so you have to try and pry them open with your fingernail, and they don't come open easily, let me tell you. I chipped my nail and risked sending a brad under the fingernail trying to get these open. When the Stampin' Up brads finally arrived, I discovered that not only do the brad-legs have different lengths, but that they're already slightly open, thus saving the fingernails. Only SU brads from now-on for me!

By the way, the other thing I learned online before making this card is that the dotted line in this stamp set can actually be used as a flower stem! It wasn't until looking through the In the Spotlight gallery on Splitcoaststampers.com that I connected the dots, so to speak.

6.20.2007

thank you

Would you like to learn how to make any of these cards? Use the contact me button on the right to set up a workshop in your home. You can earn free stamping supplies and exclusive stamp sets by hosting a workshop. This card features a new hostess set from the new catalog.


Supplies:

  • In The Spotlight stamp set - a new hostess set from the Fall/Winter collection
  • chocolate chip cardstock
  • sage shadow cardstock
  • chocolate chip classic ink pad
  • brown grosgrain ribbon

This card uses a really simple technique called masking. Just use scrap paper to cover up part of the page, and then stamp wherever you would like on the paper. Then when you remove the scrap paper you can have a different image in that blank space!

I made this card for a swap at Claire's recent "downline" meeting. Claire's the gal who got me hooked on stamping. She's recruited a bunch of new demonstrators lately, and once a month we get together to share ideas. You can find links to some of their blogs in the Stamping Links list on the right. Claire's "downline" includes bloggers Kristin and Melissa, as well as super-stampers Jan, Latrell, and Melanie.